This guide explains how to register an application in Microsoft Entra and authenticate it against the ILAP Analytics API. It covers the two supported credential flows — Entra service principal (client secret or certificate) and managed identity — and shows both header forms the API accepts: an Entra-issued bearer JWT, and the simpler IlapAnalyticsToken service token. For reporting and data extraction, the DataReader role/permission is sufficient for either form. This guide is for developers or IT staff setting up API access for an application — whether a human-facing tool or a non-human service such as a data pipeline — and assumes familiarity with Microsoft Entra app registrations and basic OAuth2 concepts.
Introduction
This article is about how to setup Microsoft Entra for each application that will use ILAP Analytics API. The article will document how to setup the correct accesses for two types of applications:
- Human applications, such as user applications.
- Non-human applications, such as a data pipeline.
When setting up the authentication for these types of services, you can do it in three ways. The first and recommended way is by using Azure Managed Identity and hosting it on Azure with your ILAP instance which allows for the most secure setup. The second way is to use Service Principals with Certifications, and the last and third way is using Service Principals with Client Secrets.
One thing to note about using Azure Managed Identities is that it only works with these types of Azure services:
If you are not using any of these, you cannot use Managed Identity and we recommend you use Service Principals with Certifications. If that doesn’t work, use Service Principals with Client secrets. The easiest for early stage development is to use client secrets.
Authorization header forms
The ILAP Analytics API accepts two forms of the Authorization header:
Authorization: bearer <jwt>— an Entra-issued JWT obtained via a Service Principal (client secret or certificate) or a Managed Identity, as set up in this article.Authorization: IlapAnalyticsToken <service token>— a simpler, long-lived service token issued directly by ILAP Analytics, useful when Entra app registration isn't practical (for example, quick scripts or third-party tools that only support a static API key).
For reporting and data extraction, the DataReader role/permission is sufficient for either token form — no write access is required.
Registering an Application
The steps below show how to register each type of application in Azure AD and grant it access to the ILAP Analytics API.
Service Principal with Client Secrets
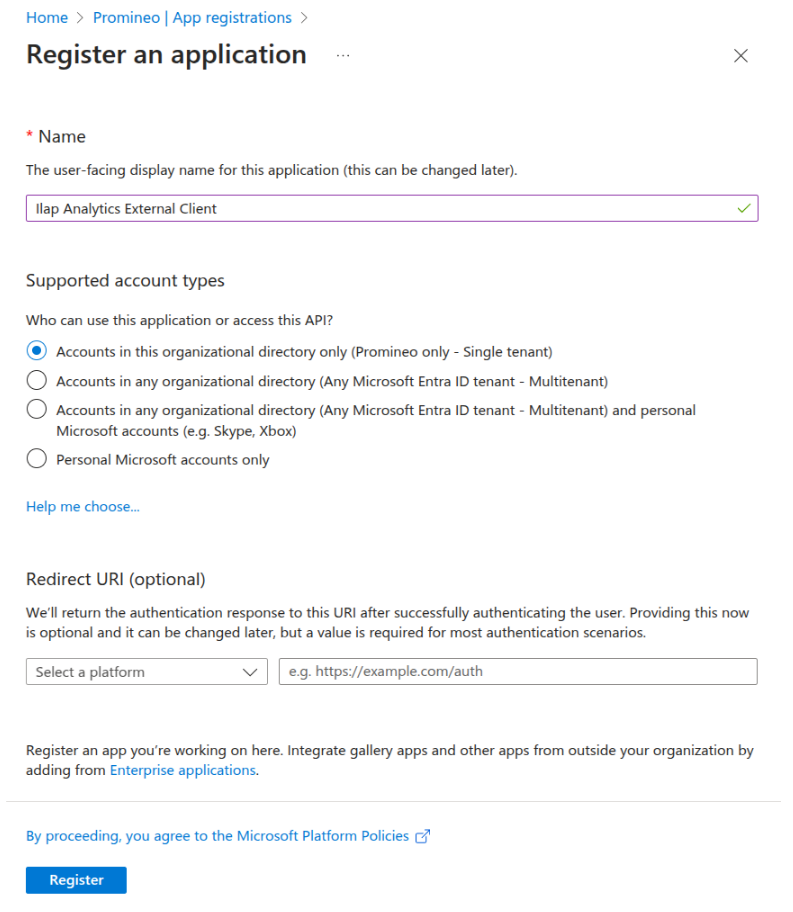
1: Register the app
Azure AD → App registrations → New registration
2: Create Client Secret
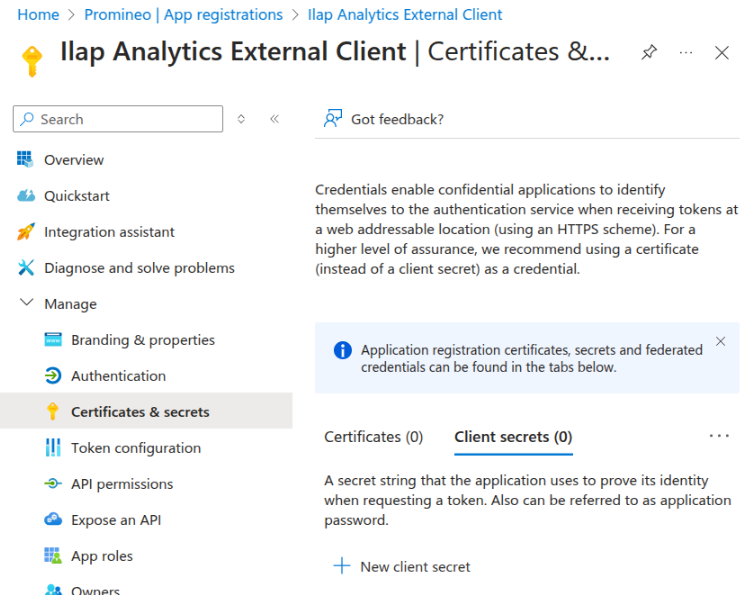
In Certificates & secrets → Client secrets, add a new secret and copy its value.
3: Assign Application Permission
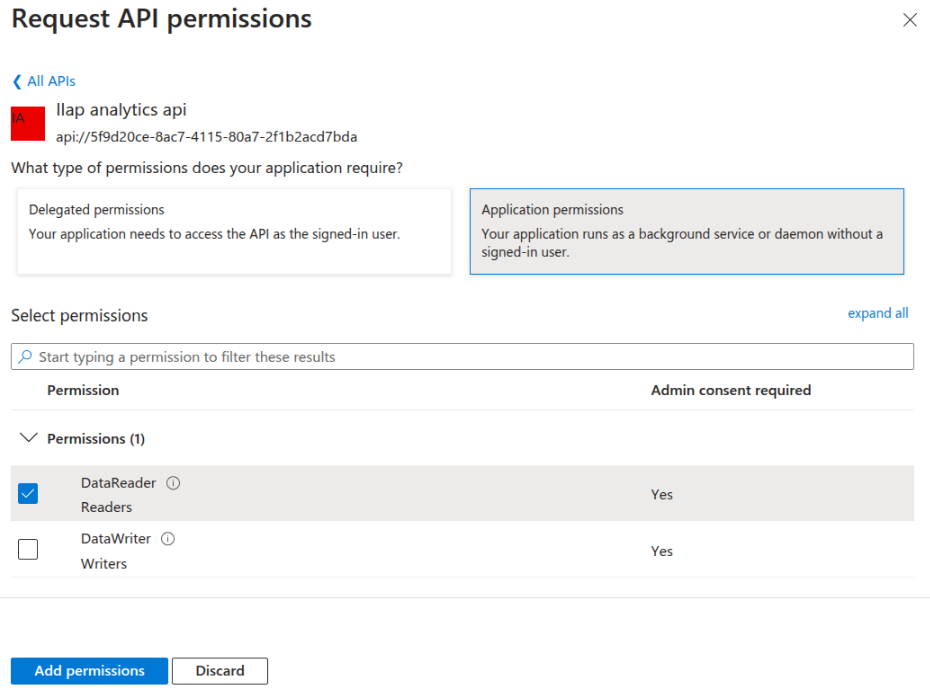
Go to API permissions → Add a permission → My APIs → “Your API”
Under Delegated permissions, check DataReader, then Add and Grant admin consent.
4: Getting the token
One security recommendation when using secrets is to never hard-code them, but use environment variables. In this example they are, but in the examples hereuse environment variables to stay as secure as possible.
from azure.identity import ClientSecretCredential
import requests

tenant_id = "<TENANT-ID>"
client_id = "<MyApp-Client-ID>"
client_secret = "<Your-Client-Secret>"

cred = ClientSecretCredential(tenant_id, client_id, client_secret)
token = cred.get_token("api://<ILAP-API-CLIENT-ID>/.default").token
Managed Identity
Prerequisite: Your app is hosted on one of the supported Azure services (App Service, Functions, VM, etc.).
1: Enable Managed Identity
In the Azure Portal, go to your App Service / Function App.
Under Settings → Identity, switch System‑assigned to On and click Save.
Copy the Object (principal) ID of the new identity.
2. Grant API Access
- In Azure AD, navigate to App registrations → select your ILAP Analytics API registration
- Under Expose an API → App roles, ensure you have a user‑delegated role (e.g.
User.Access).
{
  "allowedMemberTypes": ["User"],
  "displayName": "User",
  "value": "User.Access",
  "description": "Allow interactive apps to call the ILAP API"
}
3: Getting the token
See these examples for other languages.
from azure.identity import ManagedIdentityCredential

cred = ManagedIdentityCredential()
token = cred.get_token("api://<ILAP-API-CLIENT-ID>/.default").token
Service Principal with Certifications
1: Registering the app
Azure AD → App registrations → New registration
2: Upload certificate
In your app’s Certificates & secrets → Certificates → Upload certificate.
3: Assign API Permissions
- In API permissions → Add a permission → My APIs → select
ILAP Analytics API. - Under Delegated permissions, check DataReader, then Add and Grant admin consent.
4: Getting the token
See theseexamples for other languages.
from azure.identity import ClientCertificateCredential
import requests

tenant_id = "<TENANT-ID>"
client_id = "<MyApp-Client-ID>"
cert_path = "/path/to/pipeline-cert.pem"

cred = ClientCertificateCredential(tenant_id, client_id, cert_path)
token = cred.get_token("api://<ILAP-API-CLIENT-ID>/.default").token
Was this article helpful?
That’s Great!
Thank you for your feedback
Sorry! We couldn't be helpful
Thank you for your feedback
Feedback sent
We appreciate your effort and will try to fix the article